.NET MAUI Integration: Images & Image Size exploration
Introduction
At the end of this page, you will generate an image and display it in the glasses.
We continue from the previous page. With this resulting projec:t ExerciseFinal.zip
And will end up with this project: ExerciseSendImages.zip
The SDK allows us to send a "bitmap" and it will be displayed.
However, I haven't gotten such results with it as I wanted: at first I was a bit lost including and referencing resources in Android, from the MAUI application.
After I got that figured out, the images were either not displaying, or scaled down or with a strange aspect ratio either the image was scaled and I couldn't really figure out if it was .NET or Android or the SDK that is doing the scaling. After giving up on "pixel density" and other complicated tutorials I have gone the more simple way.
And started to find the way to find the "most ideal image size" and generate the bitmap myself. I believe this guide is a good enough base to allow you to draw anything on the glasses and gain full control to its potential.
So, let's get to it!
Approach
We need to send a bitmap - which is an image - in binary form to the Android application. But we do not want to "depend on any framework" to do the scaling.
As we are in the GUI working with HTML5 - we have access to a canvas-element. Which is basically, a sort of image that can be built via JavaScript in the browser.
This way, we can easily try some things out in a local text-editor and browser to see if it is generated well. Before we get into a heavier compilation and deployment - which loses a lot of time (and motivation).
I will first step you through the preparation of the code, to be able to render a byte[] containing a bitmap. And then, we'll write a piece of code to generate an image and send it to the glasses.
Project adjustement: boiler plate
We first have to add some Android code, to listen to the new UltraLiteOperationRequest event, convert the byte to an image format the glasses can work with. And then send it to the glasses.
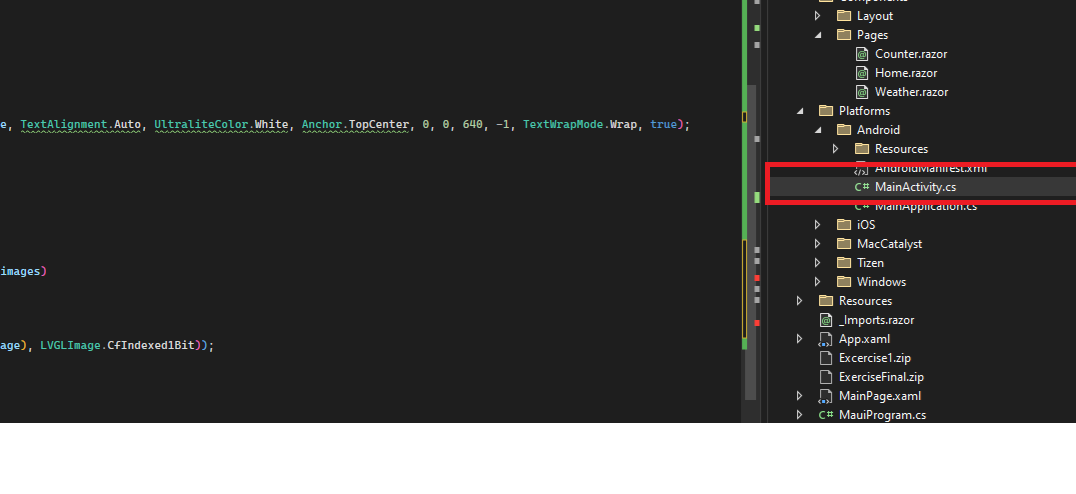
We start again in MainActivity.cs
1. Add 3 functions to translate a List<byte[]> and a byte[] to LVGImage which Vuzix works with
private static Bitmap loadBitmap(byte[] bitmapbytes)
{
    BitmapFactory.Options options = new BitmapFactory.Options();

    // https://proandroiddev.com/image-decoding-bitmaps-android-c039790ee07e
    options.InSampleSize = 2;
    options.InPreferredConfig = Bitmap.Config.Argb8888;
    Bitmap bmp = BitmapFactory.DecodeByteArray(bitmapbytes, 0, bitmapbytes.Length, options);

    return bmp;// resize(bmp, 640, 480);
}
private static LVGLImage[] loadLVGLImage(List<byte[]> images)
{
    List<LVGLImage> _images = new List<LVGLImage>();
    foreach(var image in images)
    {
        _images.Add(LVGLImage.FromBitmap(loadBitmap(image), LVGLImage.CfIndexed1Bit));
    }
    return _images.ToArray();
}
private static LVGLImage loadLVGLImage(byte[] image)
{
    //ColorObject[] _colors = { LVGLImage.IColorMapper.White, LVGLImage.IColorMapper.Mid };
    //LVGLImage _img = new LVGLImage(LVGLImage.CfIndexed1Bit, 480, 640, _colors, image);
    LVGLImage _img2 =  LVGLImage.FromBitmap(loadBitmap(image), LVGLImage.CfIndexed1Bit);
    return _img2;
}
2. Add the function processUltraLiteOperation that will process the incoming message
protected void processUltraLiteOperation(UltraLiteOperationRequest Request)
{
    if (_sdk.IsConnected)
    {
        if (!_sdk.IsControlledByMe)
        {
            _sdk.RequestControl();
        }
        if (_sdk.IsControlledByMe)
        {
            _sdk.SetLayout(Layout.Canvas, 0, true);
            if (Request.Operation == eUltraLiteOperation.ShowImage && Request.ImageBitMap != null)
            {
                LVGLImage image = loadLVGLImage(Request.ImageBitMap);
                int _imageID = _sdk.Canvas.CreateImage(image, Anchor.Center);
                if (_imageID == -1)
                {
                    showMessage("Image failed");
                }
                _sdk.Canvas.Commit();
            }
        }
    }
    else
    {
        showMessage("SDK is not connected");
    }
}
3. Add, in the OnCreate function, the event listener for the message
        protected override void OnCreate(Bundle savedInstanceState)
        {
            base.OnCreate(savedInstanceState);
            try
            {
                WeakReferenceMessenger.Default.Register<UltraLiteError>(this, (sender, e) => { processUltraLiteError(e); });
                WeakReferenceMessenger.Default.Register<UltraLiteMessage>(this, (sender, e) => { processUltraLiteMessage(e.Data); });
                _sdk = Com.Vuzix.Ultralite.IUltraliteSDK.Get(this);
            }
            catch (System.Exception ex)
            {
                showMessage(ex.Message);
            }
        }
Your full Mainactivity.cs should look like this now:
using Android.App;
using Android.Content.PM;
using Android.OS;
using Android.Widget;
using CommunityToolkit.Mvvm.Messaging;
using VuzixSDK.Class;
using Com.Vuzix.Ultralite;
using Layout = Com.Vuzix.Ultralite.Layout;
using TextAlignment = Com.Vuzix.Ultralite.TextAlignment;
using VuzixSDK.Enum;
using Android.Graphics;

namespace MauiApp1
{
    [Activity(Theme = "@style/Maui.SplashTheme", MainLauncher = true, ConfigurationChanges = ConfigChanges.ScreenSize | ConfigChanges.Orientation | ConfigChanges.UiMode | ConfigChanges.ScreenLayout | ConfigChanges.SmallestScreenSize | ConfigChanges.Density)]
    public class MainActivity : MauiAppCompatActivity
    {
        IUltraliteSDK _sdk;
        protected override void OnCreate(Bundle savedInstanceState)
        {
            base.OnCreate(savedInstanceState);
            try
            {
                WeakReferenceMessenger.Default.Register<UltraLiteError>(this, (sender, e) => { processUltraLiteError(e); });
                WeakReferenceMessenger.Default.Register<UltraLiteMessage>(this, (sender, e) => { processUltraLiteMessage(e.Data); });
                WeakReferenceMessenger.Default.Register<UltraLiteOperationRequest>(this, (sender, e) => { processUltraLiteOperation(e); });

                _sdk = Com.Vuzix.Ultralite.IUltraliteSDK.Get(this);
            }
            catch (System.Exception ex)
            {
                showMessage(ex.Message);
            }
        }
        public void showMessage(string message)
        {
            MainThread.BeginInvokeOnMainThread(() =>
            {
                var toast = Toast.MakeText(this, message, ToastLength.Short);
                toast.Show();
            });
        }
        protected void processUltraLiteError(UltraLiteError error)
        {
            if (_sdk.IsConnected)
            {
                if (!_sdk.IsControlledByMe)
                {
                    _sdk.RequestControl();
                }
                if (_sdk.IsControlledByMe)
                {
                    string _title = $"[Error]{(error.Source != null ? " " + error.Source : "")}";
                    string _error = (error.Exception != null ? $"Exception : {error.Exception.Message}" : "Error occured");
                    _sdk.SendNotification(_title, _error);
                }
            }
        }
        protected void processUltraLiteOperation(UltraLiteOperationRequest Request)
        {
            if (_sdk.IsConnected)
            {
                if (!_sdk.IsControlledByMe)
                {
                    _sdk.RequestControl();
                }
                if (_sdk.IsControlledByMe)
                {
                    _sdk.SetLayout(Layout.Canvas, 0, true);
                    if (Request.Operation == eUltraLiteOperation.ShowImage && Request.ImageBitMap != null)
                    {
                        LVGLImage image = loadLVGLImage(Request.ImageBitMap);
                        int _imageID = _sdk.Canvas.CreateImage(image, Anchor.Center);
                        if (_imageID == -1)
                        {
                            showMessage("Image failed");
                        }
                        _sdk.Canvas.Commit();
                    }
                }
            }
            else
            {
                showMessage("SDK is not connected");
            }
        }
        private static Bitmap loadBitmap(byte[] bitmapbytes)
        {
            BitmapFactory.Options options = new BitmapFactory.Options();

            // https://proandroiddev.com/image-decoding-bitmaps-android-c039790ee07e
            options.InSampleSize = 2;
            options.InPreferredConfig = Bitmap.Config.Argb8888;
            Bitmap bmp = BitmapFactory.DecodeByteArray(bitmapbytes, 0, bitmapbytes.Length, options);
            return bmp;// resize(bmp, 640, 480);
        }
        private static LVGLImage[] loadLVGLImage(List<byte[]> images)
        {
            List<LVGLImage> _images = new List<LVGLImage>();
            foreach (var image in images)
            {
                _images.Add(LVGLImage.FromBitmap(loadBitmap(image), LVGLImage.CfIndexed1Bit));
            }
            return _images.ToArray();
        }
        private static LVGLImage loadLVGLImage(byte[] image)
        {
            //ColorObject[] _colors = { LVGLImage.IColorMapper.White, LVGLImage.IColorMapper.Mid };
            //LVGLImage _img = new LVGLImage(LVGLImage.CfIndexed1Bit, 480, 640, _colors, image);
            LVGLImage _img2 = LVGLImage.FromBitmap(loadBitmap(image), LVGLImage.CfIndexed1Bit);
            return _img2;
        }

        protected void processUltraLiteMessage(String message)
        {
            if (_sdk.IsConnected)
            {
                if (!_sdk.IsControlledByMe)
                {
                    _sdk.RequestControl();
                }
                if (_sdk.IsControlledByMe)
                {
                    _sdk.SetLayout(Layout.Canvas, 0, true);
                    int textId = _sdk.Canvas.CreateText(message, TextAlignment.Auto, UltraliteColor.White, Anchor.TopCenter, 0, 0, 640, -1, TextWrapMode.Wrap, true);
                    if (textId == -1)
                    {
                        showMessage("Text failed");
                    }
                    _sdk.Canvas.Commit();
                }
            }
        }
    }
}
The MAUI code to send the image
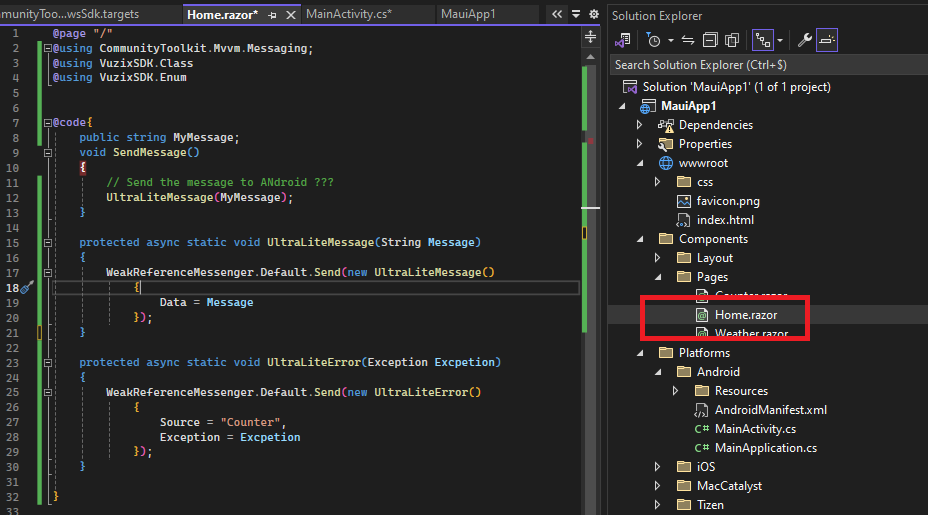
We'll go back to the Home.razor page and connect the GUI with the Android code
1. Add the function to send the UltraLiteOperationRequest containing a byte[] to the Android back end
        protected async static void UltraLiteOperation(eUltraLiteOperation operation,  byte[] BitMap = null)
        {
            WeakReferenceMessenger.Default.Send(new UltraLiteOperationRequest()
                {
                    Operation = operation,
                    ImageBitMap = BitMap

                });
        }
Add the folllowing function in a code block in the Home.razor page, this will expose the function to the script that we will write to trigger
    public static void SendGeneratedBMP(string response)
    {
        try
        {
            UltraLiteOperation(eUltraLiteOperation.ShowImage, Convert.FromBase64String(response));
        }
        catch (System.Exception ex)
        {
            UltraLiteError(ex);
        }
    }
You are all set for the backend! But, what will you send over the line ?
CANVAS to BITMAP
Let's take a step back and rephrase what we want to achieve: "I want to define a size for an image. And then send it to the Z100"
1. Write the Javascript code to handle the GUI
This is where it gets confusing for some: we're now in the context of the browser or the GUI - which can't just access the "machine code". We need to make use of the DotNet functions to pass data from the front to the back. While the drawing and clicking is happening on the front end.
If it sounds confusing, just take the code an play with it.
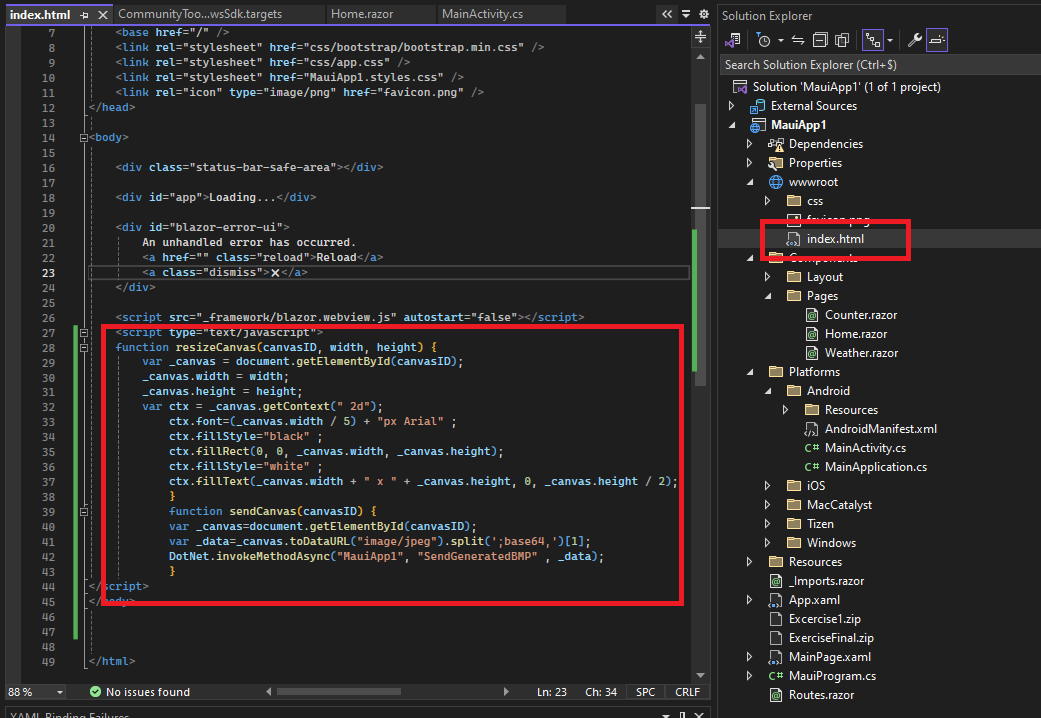
Open the index.html to add some javascript - this isn't the most "clean and proper way", but this will get it working for you while you write the gold standard code:
Enter this fragment of code.
The first will get the element you specified and resize it to your specified width and height.
The other, will use standard JavaScript functions to parse the displayed graphic into a Base64 string (which is a text representation of a byte) - and will send it to the backend by this DotNet.invokeMethodAsync (you might need to replace the projectname with your own for it to work)
<script type="text/javascript>
    function resizeCanvas(canvasID, width, height) {
        var _canvas = document.getElementById(canvasID);
        _canvas.width = width;
        _canvas.height = height;
        var ctx = _canvas.getContext("2d");

        ctx.font = (_canvas.width / 5) + "px Arial";

        ctx.fillStyle = "black";
        ctx.fillRect(0, 0, _canvas.width, _canvas.height);


        ctx.fillStyle = "white";
        ctx.fillText(_canvas.width + " x " + _canvas.height, 0, _canvas.height / 2);

    }

    function sendCanvas(canvasID) {

        var _canvas = document.getElementById(canvasID);
        var _data = _canvas.toDataURL("image/jpeg").split(';base64,')[1];
        DotNet.invokeMethodAsync("MauiApp1", "SendGeneratedBMP", _data);
    }
</script>
2. Adapt the Home.razor page to call your methods
<input type="text" @bind="@MyMessage" />
<button class="btn btn-primary" @onclick="SendMessage">Send Message</button>
<br />
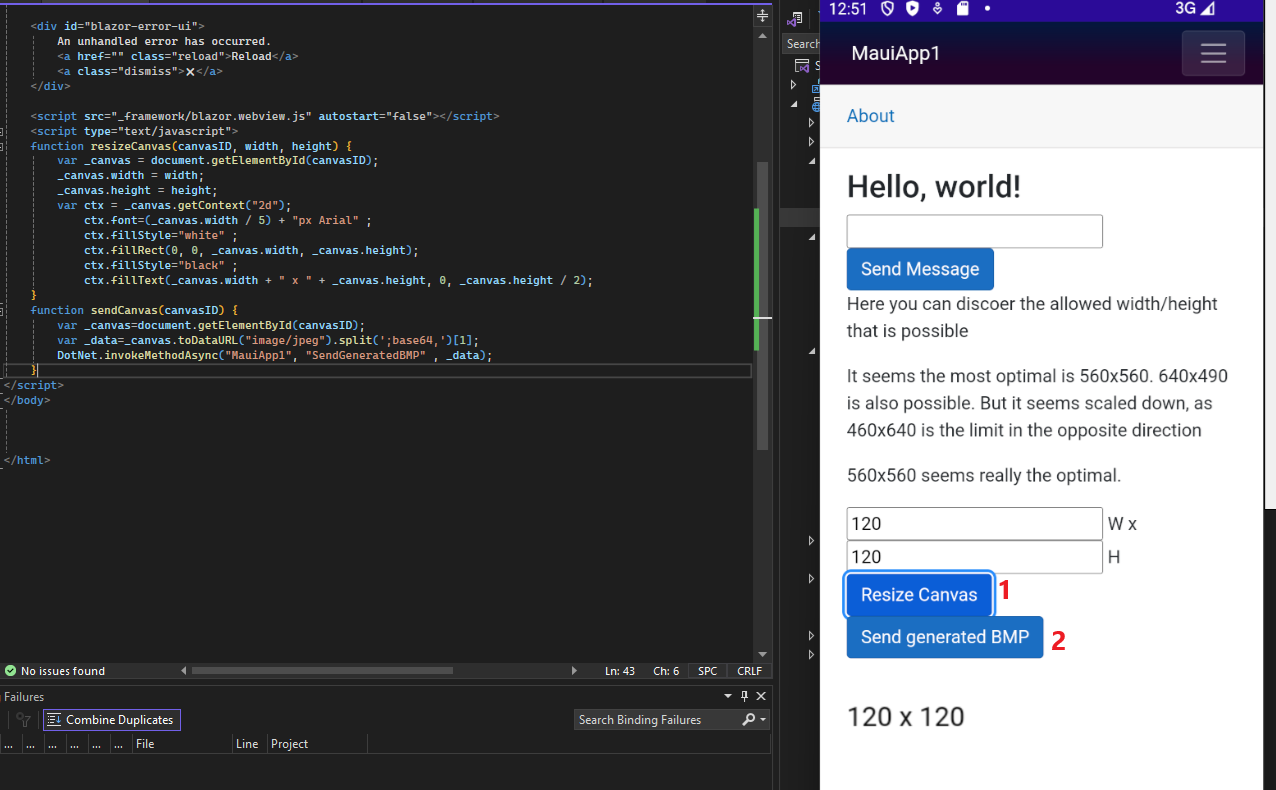
<p>Here you can discoer the allowed width/height that is possible</p>
<p>It seems the most optimal is 560x560. 640x490 is also possible. But it seems scaled down, as 460x640 is the limit in the opposite direction</p>
<p>560x560 seems really the optimal.</p>
<input type="number" id="bmpWidth" maxlength="3" value="120" max="640" /> W x
<input type="number" maxlength="3" id="bmpHeight" value="120" max="640" /> H
<br />
<button class="btn btn-primary" onclick="resizeCanvas('myCanvas', document.getElementById('bmpWidth').value,document.getElementById('bmpHeight').value)">Resize Canvas</button>
    <br />
<button class="btn btn-primary" onclick="sendCanvas('myCanvas')">Send generated BMP</button>
<br />
<canvas id="myCanvas" width="560" height="560"</canvas>
Your full Home.razor would look like this
@page "/"
@using CommunityToolkit.Mvvm.Messaging;
@using VuzixSDK.Class
@using VuzixSDK.Enum


@code{
    public string MyMessage;
    void SendMessage()
    {
        // Send the message to ANdroid ???
        UltraLiteMessage(MyMessage);
    }

    protected async static void UltraLiteMessage(String Message)
    {
        WeakReferenceMessenger.Default.Send(new UltraLiteMessage()
            {
                Data = Message
            });
    }

    protected async static void UltraLiteError(Exception Excpetion)
    {
        WeakReferenceMessenger.Default.Send(new UltraLiteError()
            {
                Source = "Counter",
                Exception = Excpetion
            });
    }
    [JSInvokable("SendGeneratedBMP")] // This is required in order to JS be able to execute it
    public static void SendGeneratedBMP(string response)
    {
        try
        {
            UltraLiteOperation(eUltraLiteOperation.ShowImage, Convert.FromBase64String(response));
        }
        catch (System.Exception ex)
        {
            UltraLiteError(ex);
        }
    }
    protected async static void UltraLiteOperation(eUltraLiteOperation operation, byte[] BitMap = null)
    {
        WeakReferenceMessenger.Default.Send(new UltraLiteOperationRequest()
            {
                Operation = operation,
                ImageBitMap = BitMap
            });
    }

}

<h1>Hello, world!</h1>
@if (MyMessage != null && MyMessage.Length>0 )
{
<p>You wrote: @MyMessage</p>
}

<input type="text" @bind="@MyMessage" />
<button class="btn btn-primary" @onclick="SendMessage">Send Message</button>
<br />
<p>Here you can discoer the allowed width/height that is possible</p>
<p>It seems the most optimal is 560x560. 640x490 is also possible. But it seems scaled down, as 460x640 is the limit in the opposite direction</p>
<p>560x560 seems really the optimal.</p>
<input type="number" id="bmpWidth" maxlength="3" value="120" max="640" /> W x
<input type="number" maxlength="3" id="bmpHeight" value="120" max="640" /> H
<br />
<button class="btn btn-primary" onclick="resizeCanvas('myCanvas', document.getElementById('bmpWidth').value,document.getElementById('bmpHeight').value)">Resize Canvas</button>
    <br />
<button class="btn btn-primary" onclick="sendCanvas('myCanvas')">Send generated BMP</button>
<br />
<canvas id="myCanvas" width="560" height="560"</canvas>
And whether you believe it or not - you have finished. You have now full control over your glasses.
When you enter a new size, and click the button. The image will be adjusted.
When you click "Send generated BMP" - it will show up in the glasses (if you deploy it on your Android phone, by connecting it and choosing it as debug target)
You can use it to try to see which image size looks best for your purpose.
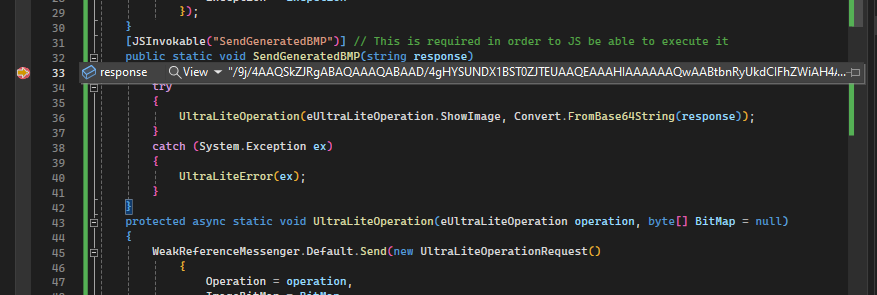
You ca set a breakpoint in the code to see what comes back:
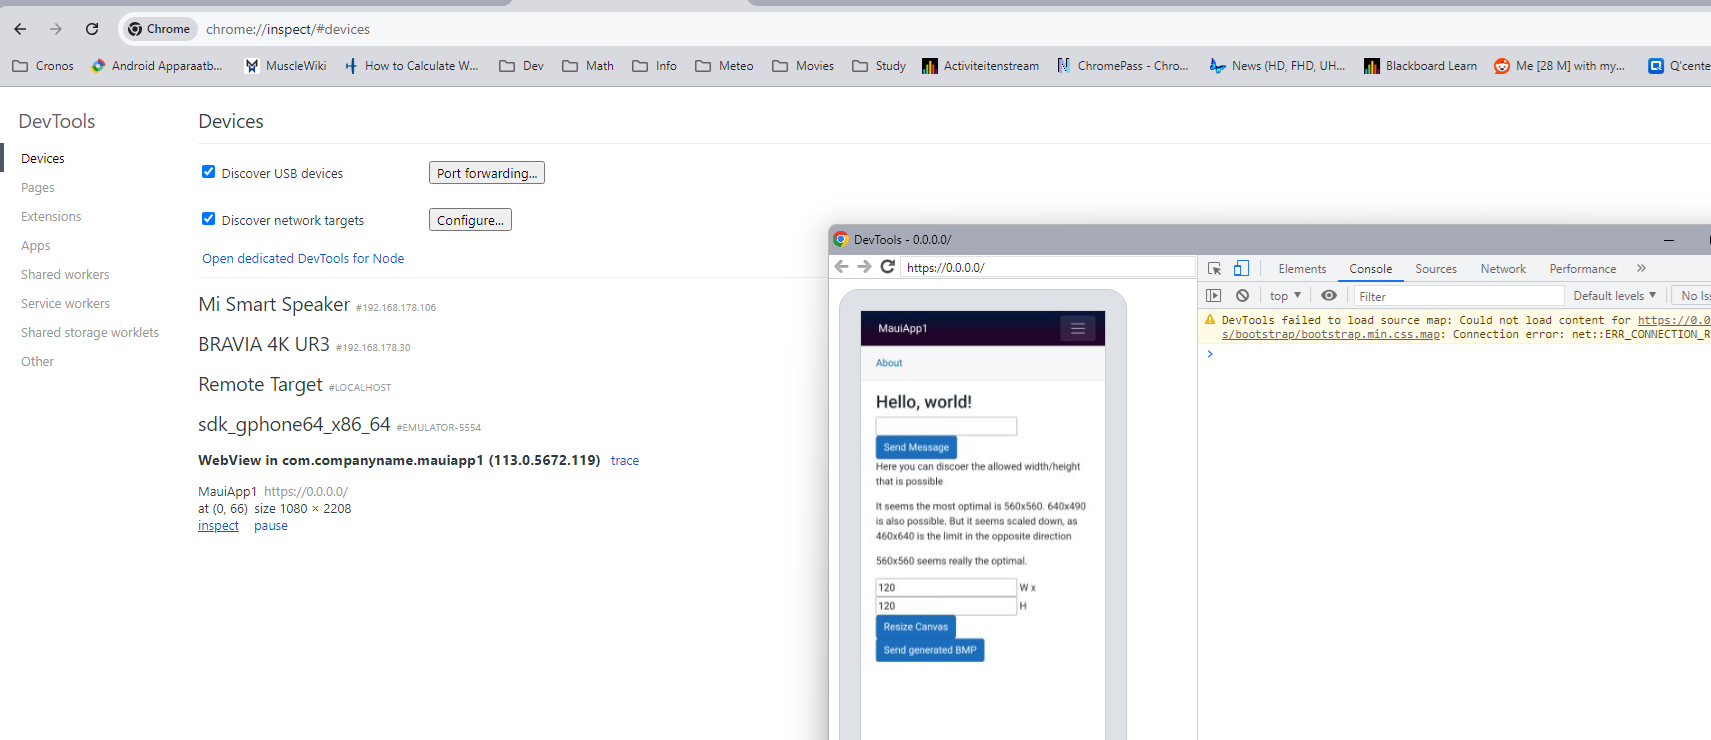
If you are in this stage trying to debug but can't find the source of an issue, you can use chrome:
Enter the url chrome://inspect/devices and click the "inspect" link on the active debugging session (emulator or your phone) and then you can use the developer tools from the browser to read error or work on it.
Source code: ExerciseSendImages.zip

