# .NET MAUI Integration: First contact
#### Introduction
On this page, it's assumed you have a MAUI project with the nuget package ready to go.
In the end, you will be able to make a simple HTML website that receives text and it will be shown in the Z100 AR glasses.
If you don't want to spend time for going step by step, here are the source files:
[Excercise1.zip](/attachments/2)
[ExerciseFinal.zip](/attachments/1)
##### Background
Don't be overwhelmed: you don't need to study this, but it will help you to conceptualize where which code will be run. And what you can access or in what context you are operating.
MAUI is a front that runs in a HTML engine with [JQuery](https://jquery.com/) and [Bootstrap](https://getbootstrap.com/) which make it easy to make interactive web interfaces.
It then communicates to the actual back-end of the application via asynchronous calls - via their [SignalR ](/SignalR)engine.
This helps to write "classic server code" but having the fluid easy GUI that web applications have.
In the back on the "server code" - there is a translation layer towards the target host technology. In this example, this will be Android.
We just have to *somehow* translate a mouse click, to go to the server code. And from the server code, towards the Android device.
For this reason, we're using the [ CommunityToolkit.Mvvm.Messaging ](https://www.nuget.org/packages/CommunityToolkit.Mvvm)package, which allows to "listen" and "trigger" events that can be picked up via event handlers. We do not have to concern who triggered it, or where it was triggered. Via the magic of dependency injection, this is all handled for us.
##### Lets get to it!
[Excercise1.zip](/attachments/2)
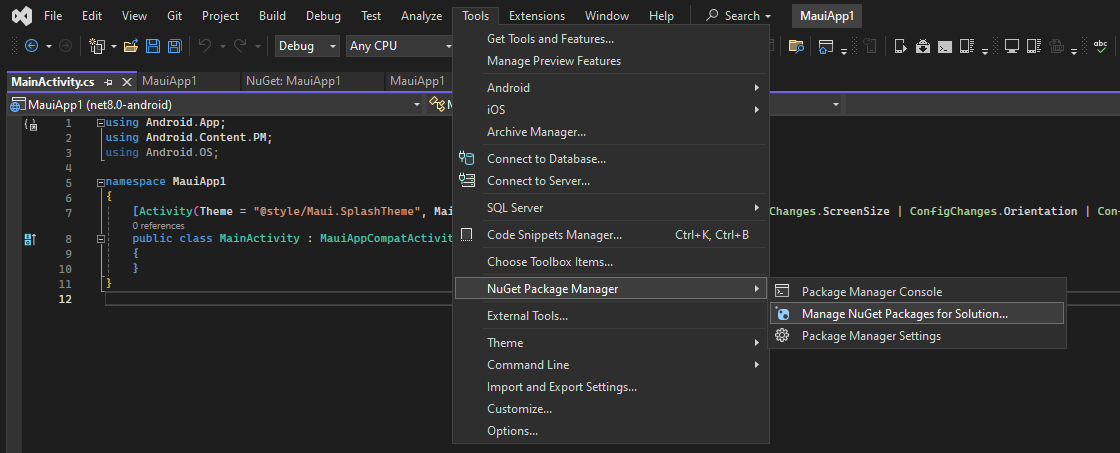
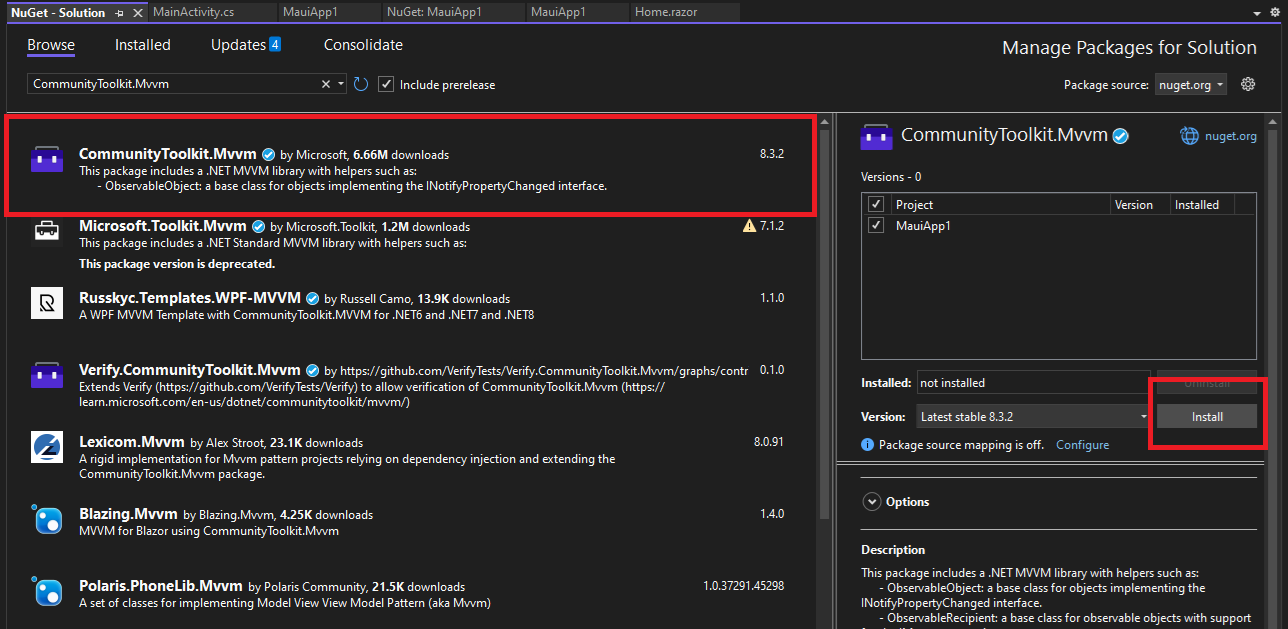
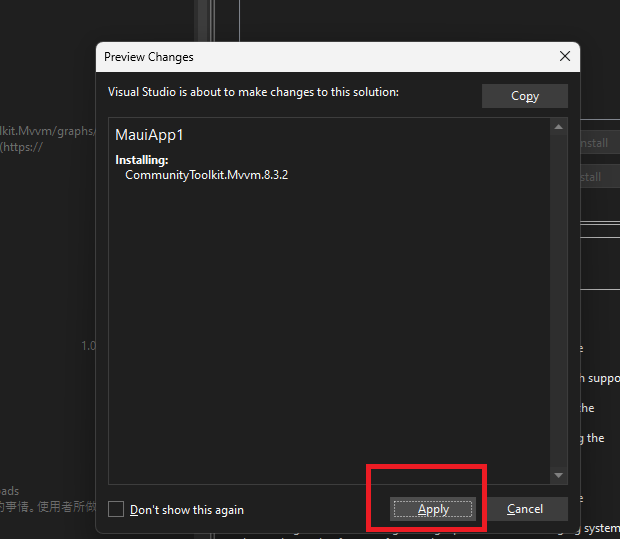
1\. First, lets get the [ CommunityToolkit.Mvvm.Messaging ](https://www.nuget.org/packages/CommunityToolkit.Mvvm)package into the solution.
[](/uploads/images/gallery/2024-10/A2bimage.png)
[](/uploads/images/gallery/2024-10/7dIimage.png)
[](/uploads/images/gallery/2024-10/TtFimage.png)
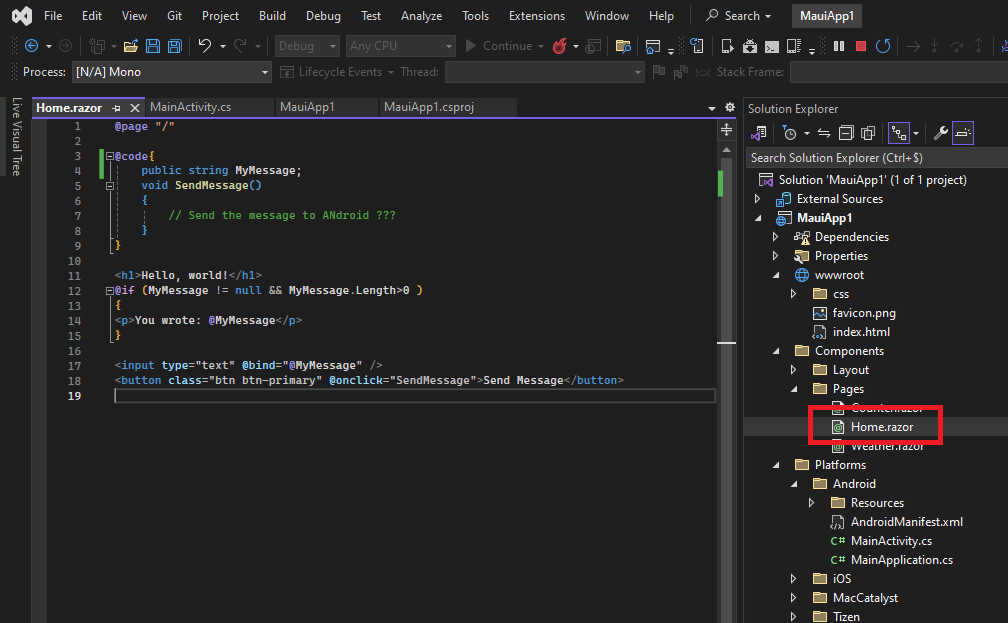
2\. Now we can write a simple code in the Home.razor page to take text.
[](/uploads/images/gallery/2024-10/ssPimage.png)
This example connects the value of the variable @***message*** into the textbox.
When the textbox is clicked, the function ***SendMessage()*** is triggered.
Because of the nature of Blazor - the page is refreshed. At the refresh, there is now a value. And your value is displayed.
```c#
@page "/"
@code{
public string MyMessage;
void SendMessage()
{
// Send the message to ANdroid ???
}
}
Hello, world!
@if (MyMessage != null && MyMessage.Length>0 )
{
You wrote: @MyMessage
}
```
Run your emulator to try it out and see everything is working okay:
[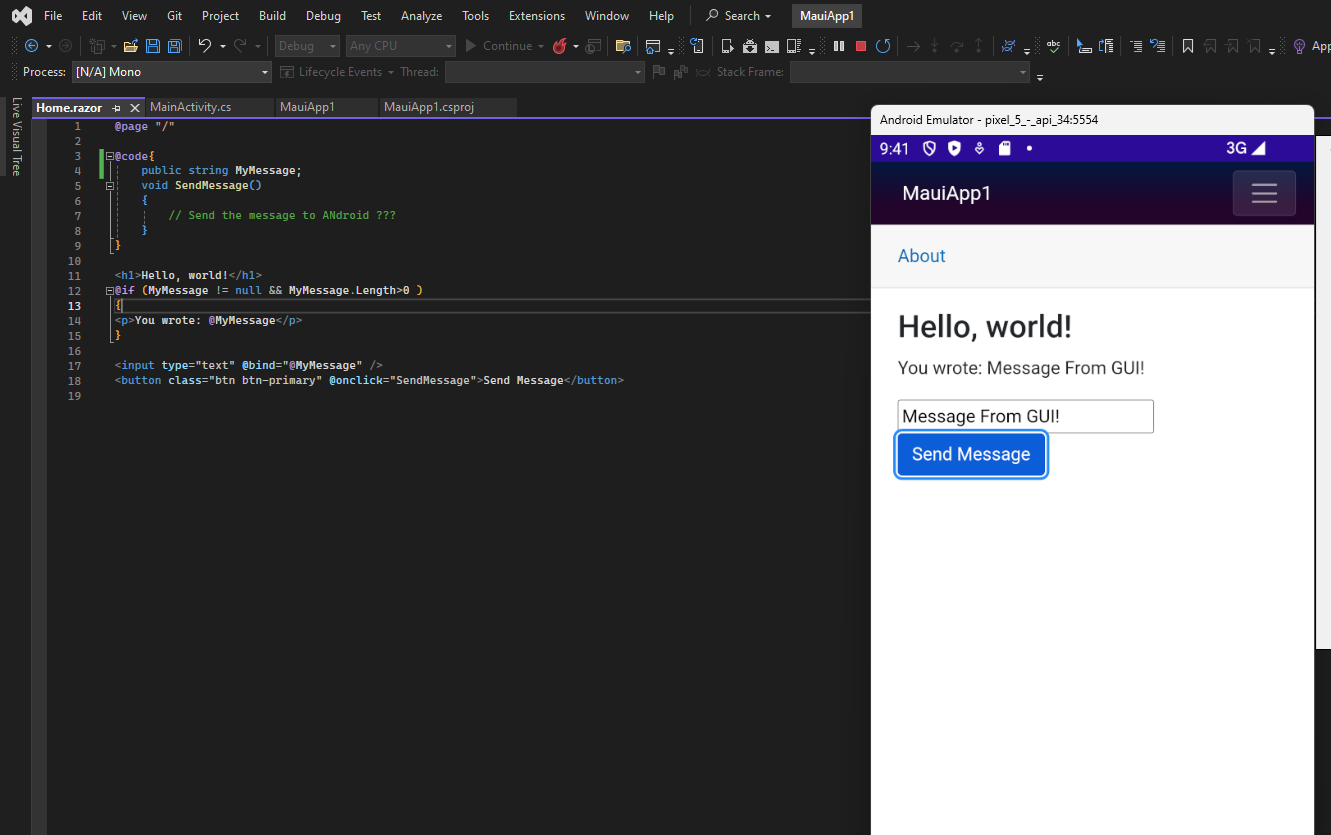](/uploads/images/gallery/2024-10/6UNimage.png)
If you'd like you can set a breakpoint to inspect your variable as well, by clicking the left bar to set a red dot. And running your example. While hovering over your variable.
[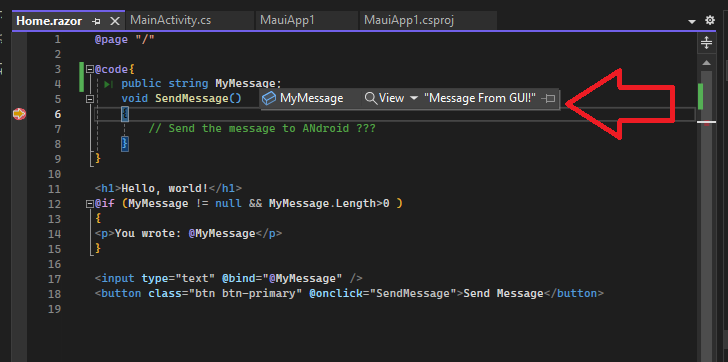](/uploads/images/gallery/2024-10/s8Himage.png)
3\. And now the real work (in 5 minutes) - Set up the GUI to send the message.
In this step we will send messages from the GUI towards Android. Know, that we can do the reverse, and send from Android towards the GUI if desired. But in our case, Android will forward the message to our glasses!
Add using directives, so the page knows where to find the nuget classes
```c#
@page "/"
@using CommunityToolkit.Mvvm.Messaging;
@using VuzixSDK.Class
@using VuzixSDK.Enum
```
And add the following 2 functions to your code.
These functions will use the Mvvm.Messaging WeakReferenceMessanger and send a class of UltraLiteMessage in one function, based on the string.
And an UltraLiteError in the second function. So we can display errors to the user.
```c#
protected async static void UltraLiteMessage(String Message)
{
WeakReferenceMessenger.Default.Send(new UltraLiteMessage()
{
Data = Message
});
}
protected async static void UltraLiteError(Exception Excpetion)
{
WeakReferenceMessenger.Default.Send(new UltraLiteError()
{
Source = "Counter",
Exception = Excpetion
});
}
```
And update your **SendMessage** function to trigger the **UltraLiteMessage** function.
```c#
void SendMessage()
{
// Send the message to ANdroid ???
UltraLiteMessage(MyMessage);
}
```
Your full home.razor page will look as such:
```c#
@page "/"
@using CommunityToolkit.Mvvm.Messaging;
@using VuzixSDK.Class
@using VuzixSDK.Enum
@code{
public string MyMessage;
void SendMessage()
{
// Send the message to ANdroid ???
UltraLiteMessage(MyMessage);
}
protected async static void UltraLiteMessage(String Message)
{
WeakReferenceMessenger.Default.Send(new UltraLiteMessage()
{
Data = Message
});
}
protected async static void UltraLiteError(Exception Excpetion)
{
WeakReferenceMessenger.Default.Send(new UltraLiteError()
{
Source = "Counter",
Exception = Excpetion
});
}
}
Hello, world!
@if (MyMessage != null && MyMessage.Length>0 )
{
You wrote: @MyMessage
}
```
That's it for your personal code.
What is left, is to receive your text and show it on the glasses.
4\. Receive the text in Android
Locate the file ***MainActivity.cs*** and add the using statement towards the Mvvm.Messaging library.
[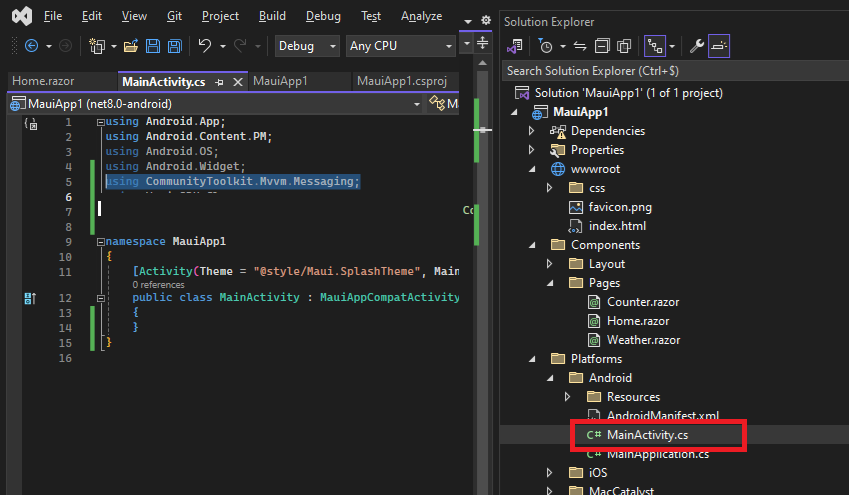](/uploads/images/gallery/2024-10/OCKimage.png)
And create the following functions:
- **OnCreate** is an entrypoint in Android and will be run at the start of the application.
- We then register a listener for the messages that the front end is sending to us: **UltraLiteError** and **UltraLiteMessage** by the **WeakReferenceMessenger** declaration.
- **showMessage** will show a basic Android notification on the screen, it's always convenient to show errors if something goes wrong
In essense; when the application is created, when a message with object of class **UltraLiteError** is received, it will end up in the **processUltraLiteError** function.
When the application receives a message with object of class **UltraLiteMessage**, it will end up in the **processUltraLiteMessage** function.
```c#
protected override void OnCreate(Bundle savedInstanceState)
{
base.OnCreate(savedInstanceState);
try
{
WeakReferenceMessenger.Default.Register(this, (sender, e) => { processUltraLiteError(e); });
WeakReferenceMessenger.Default.Register(this, (sender, e) => { processUltraLiteMessage(e.Data); });
}
catch (System.Exception ex)
{
showMessage(ex.Message);
}
}
public void showMessage(string message)
{
MainThread.BeginInvokeOnMainThread(() =>
{
var toast = Toast.MakeText(this, message, ToastLength.Short);
toast.Show();
});
}
protected void processUltraLiteError(UltraLiteError error)
{
}
protected void processUltraLiteMessage(String message)
{
}
```
At this point you can run or compile the code, but lets now connect the glasses.
##### Integrating the VUZIX SDK
[ExerciseFinal.zip](/attachments/1)
First add using statements for the Vuzix SDK
```
using VuzixSDK.Class;
using Com.Vuzix.Ultralite;
```
Then, declare a variable \_sdk, which will hold a reference to the Vuzix SDK
```
IUltraliteSDK _sdk;
```
In the OnCreate function, asssign the variable
```
_sdk = Com.Vuzix.Ultralite.IUltraliteSDK.Get(this);
```
And update our functions, to display the text on the glasses:
```
protected void processUltraLiteError(UltraLiteError error)
{
if (_sdk.IsConnected)
{
if (!_sdk.IsControlledByMe)
{
_sdk.RequestControl();
}
if (_sdk.IsControlledByMe)
{
string _title = $"[Error]{(error.Source != null ? " " + error.Source : "")}";
string _error = (error.Exception != null ? $"Exception : {error.Exception.Message}" : "Error occured");
_sdk.SendNotification(_title, _error);
}
}
}
protected void processUltraLiteMessage(String message)
{
if (_sdk.IsConnected)
{
if (!_sdk.IsControlledByMe)
{
_sdk.RequestControl();
}
if (_sdk.IsControlledByMe)
{
_sdk.SetLayout(Layout.Canvas, 0, true);
int textId = _sdk.Canvas.CreateText(message, TextAlignment.Auto, UltraliteColor.White, Anchor.TopCenter, 0, 0, 640, -1, TextWrapMode.Wrap, true);
if (textId == -1)
{
showMessage("Text failed");
}
_sdk.Canvas.Commit();
}
}
}
```
Your full MainActivity.cs will look like this:
```c#
using Android.App;
using Android.Content.PM;
using Android.OS;
using Android.Widget;
using CommunityToolkit.Mvvm.Messaging;
using VuzixSDK.Class;
using Com.Vuzix.Ultralite;
using Layout = Com.Vuzix.Ultralite.Layout;
using TextAlignment = Com.Vuzix.Ultralite.TextAlignment;
namespace MauiApp1
{
[Activity(Theme = "@style/Maui.SplashTheme", MainLauncher = true, ConfigurationChanges = ConfigChanges.ScreenSize | ConfigChanges.Orientation | ConfigChanges.UiMode | ConfigChanges.ScreenLayout | ConfigChanges.SmallestScreenSize | ConfigChanges.Density)]
public class MainActivity : MauiAppCompatActivity
{
IUltraliteSDK _sdk;
protected override void OnCreate(Bundle savedInstanceState)
{
base.OnCreate(savedInstanceState);
try
{
WeakReferenceMessenger.Default.Register(this, (sender, e) => { processUltraLiteError(e); });
WeakReferenceMessenger.Default.Register(this, (sender, e) => { processUltraLiteMessage(e.Data); });
_sdk = Com.Vuzix.Ultralite.IUltraliteSDK.Get(this);
}
catch (System.Exception ex)
{
showMessage(ex.Message);
}
}
public void showMessage(string message)
{
MainThread.BeginInvokeOnMainThread(() =>
{
var toast = Toast.MakeText(this, message, ToastLength.Short);
toast.Show();
});
}
protected void processUltraLiteError(UltraLiteError error)
{
if (_sdk.IsConnected)
{
if (!_sdk.IsControlledByMe)
{
_sdk.RequestControl();
}
if (_sdk.IsControlledByMe)
{
string _title = $"[Error]{(error.Source != null ? " " + error.Source : "")}";
string _error = (error.Exception != null ? $"Exception : {error.Exception.Message}" : "Error occured");
_sdk.SendNotification(_title, _error);
}
}
}
protected void processUltraLiteMessage(String message)
{
if (_sdk.IsConnected)
{
if (!_sdk.IsControlledByMe)
{
_sdk.RequestControl();
}
if (_sdk.IsControlledByMe)
{
_sdk.SetLayout(Layout.Canvas, 0, true);
int textId = _sdk.Canvas.CreateText(message, TextAlignment.Auto, UltraliteColor.White, Anchor.TopCenter, 0, 0, 640, -1, TextWrapMode.Wrap, true);
if (textId == -1)
{
showMessage("Text failed");
}
_sdk.Canvas.Commit();
}
}
}
}
}
```
When you run the code on your Android phone, which has the [Vuzix Connect app](https://play.google.com/store/apps/details?id=com.vuzix.connect) installed, the text from the input field will appear on the glasses when you click the button.
In [the next chapter](/books/vuzix/page/net-maui-integration-images-image-size-exploration ".NET MAUI Integration: Images & Image Size exploration"), we will update this code to send images from the GUI into the glasses.