# Raspberry PI
# Start a script as a service
```
sudo nano /etc/systemd/system/ptcam-app.service
```
Create an ini file
```
[Unit]
Description=PanTilt Camera Web App
After=network-online.target
Wants=network-online.target
[Service]
User=sophior
WorkingDirectory=/home/sophior/pt_rpi
ExecStart=/home/sophior/pt_rpi/venv/bin/python -u /home/sophior/pt_rpi/app.py
Restart=always
RestartSec=5
[Install]
WantedBy=multi-user.target
```
Start
```
sudo systemctl daemon-reload
sudo systemctl enable ptcam-app.service
sudo systemctl start ptcam-app.service
```
Check logs
```
journalctl -u ptcam-app.service -f
```
Stop/restart
```
sudo systemctl restart ptcam-app.service
sudo systemctl restart ptcam-headtracker.service
```
# Enable Filesharing
Install samba
```
sudo apt update
sudo apt install -y samba
```
Set password
```
sudo smbpasswd -a sophior
```
edit config
```
sudo nano /etc/samba/smb.conf
[pt_rpi]
path = /home/sophior/pt_rpi
browseable = yes
read only = no
guest ok = no
valid users = sophior
force user = sophior
create mask = 0664
directory mask = 0775
```
Restart Samba
```
sudo systemctl restart smbd
```
# Fix DNS (apt-get doesn't work)
When apt-get update times out or you can't reach servers that you know are online
```
sudo rm -f /etc/resolv.conf
echo "nameserver 1.1.1.1" | sudo tee /etc/resolv.conf
echo "nameserver 8.8.8.8" | sudo tee -a /etc/resolv.conf
ping -c 2 deb.debian.org
```
# Enabled dual camera (Raspberry pi 5)
When you can only see one of both cameras:
rpicam-hello --list-cameras
[https://docs.arducam.com/Raspberry-Pi-Camera/Pivariety-Camera/Libcamera-User-Guide/#introduction 123](https://docs.arducam.com/Raspberry-Pi-Camera/Pivariety-Camera/Libcamera-User-Guide/#introduction) to do:
```bash
install_pivariety_pkgs.sh -p libcamera_dev
install_pivariety_pkgs.sh -p libcamera_apps
install_pivareity_pkgs.sh -p kernel_driver
```
# Access files over HTTP quickly
python3 -m http.server 8080Current folder will now be accessible over http
# Set HTTPS to bypass browser constraints
cd ~/pt\_rpi
openssl req -x509-newkey rsa:2048 -nodes \\
-keyout ssl.key \\
-out ssl.crt \\
-days365 \\
-subj"/CN=192.168.178.123"socketio.run(
app,
host='0.0.0.0',
port=5000,
ssl\_context=('ssl.crt', 'ssl.key'),
allow\_unsafe\_werkzeug=True
)
# stream camera feed
**Broadcast from Raspberry pi:**
rpicam-vid --camera 0 --inline --width 2028 --height 1080 --listen --timeout 0 --profile high --intra 1 -o [tcp://0.0.0.0:8888](tcp://0.0.0.0:8888)
**Receive on PC:**
ffplay -fflags nobuffer -flags low\_delay -probesize 32 tcp://192.168.178.123:8888
# Fixing blurry 8-50mm Zoom Lens for Raspberry Pi High Quality Camera
When you mounted the lense with C-mount, it might be that everything is extremely blurry.
To adjust it, might feel like a daunting task.
The issue is the focal point when you attach the lense too close to the sensor. For this, you have the lock-screw on the C-mount and should not screw in the lense all the way to the end.
Ideally you'd open a video stream and watch it with the near/far focal ring in the middle and the tele/wide ring in the middle.While you adjust the C-mount screw depth.
[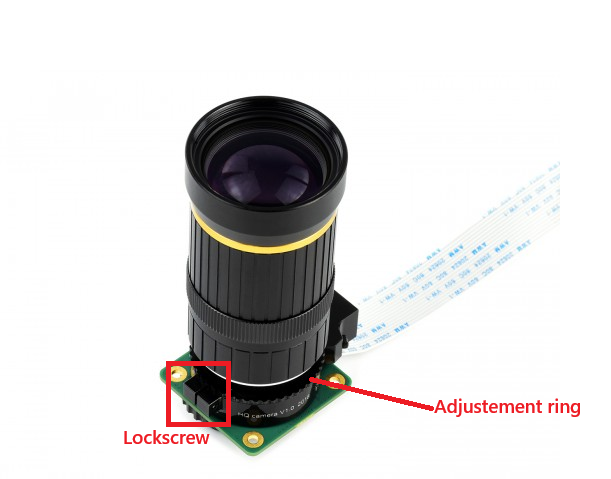](https://wiki.sophior.com/uploads/images/gallery/2026-05/cjwimage.png)
You'd want to reach a point where either focal rings will have impact on sharpness with very tiny mainpulations (1/10th of a mm will be blurry or not blurry).
You could make such a program and then refresh the page after every manipulation to focus the lens.
```
@app.route('/hq_snapshot')
def hq_snapshot():
path = "/tmp/hq_snapshot.jpg"
subprocess.run([
"rpicam-still",
"--camera", "0",
"--nopreview",
"--timeout", "300",
"--width", "1920",
"--height", "1080",
"-o", path
], stdout=subprocess.DEVNULL, stderr=subprocess.DEVNULL)
return send_file(path, mimetype="image/jpeg")
```
After you're done, lock the lockscrew.
Now, you should be able to focus with the focal rings, you'd set the tele/wide ring to approximately the object you want to have in focus and adjust the "near/far" until it becomes sharp.
Opeing the shutter (open/close) ring has some effect on sharpness or image bleed. It reduces or increases the amount of light that hits the sensor. In bright shiny days, fully open shutter will create fuzzy overexposed images.
# Raspberry PI Zero 2W camera
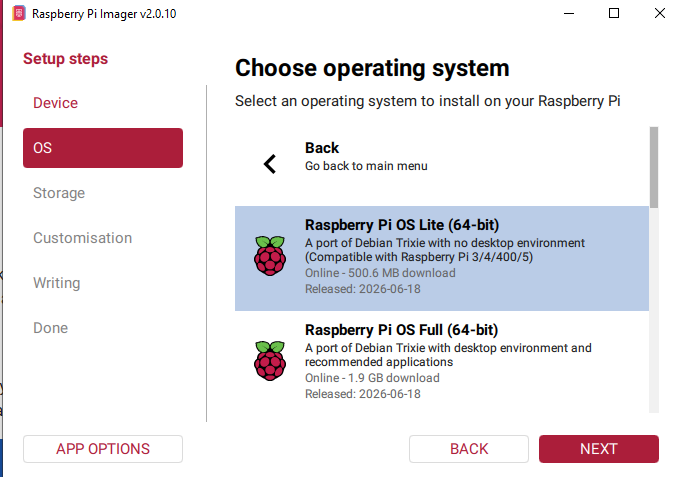
1. Get the imager [https://www.raspberrypi.com/software/](https://www.raspberrypi.com/software/) and write to sdcard, configure the dialogues
[](https://wiki.sophior.com/uploads/images/gallery/2026-07/image.png)
2\. Plug in the sdcard, start the raspberry and log in via putty (find IP on router)
-> an USB port might not be powerful enough for heavy operations, so preerably a power outlet
3\. Update and install workloads
```
sudo apt update
sudo apt full-upgrade -y
sudo apt install -y \
rpicam-apps \
python3-picamera2 \
python3-numpy \
python3-av \
ffmpeg \
samba
sudo reboot
```
Test the camera
```
rpicam-hello --list-cameras
```
Create directories
```
mkdir -p ~/camera ~/videos ~/timelapse
```
Upload scripts (via powershell)
```
scp C:\ZeroCameraBackup\record-motion.py xxx@Zero.local:/home/xxx/camera/
scp C:\ZeroCameraBackup\aim-camera.sh xxx@Zero.local:/home/xxx/camera/
scp C:\ZeroCameraBackup\timelapse-camera.sh xxx@Zero.local:/home/xxx/camera/
```
In putty:
```
chmod +x ~/camera/record-motion.py
chmod +x ~/camera/aim-camera.sh
chmod +x ~/camera/timelapse-camera.sh
```
Create Services
```
sudo nano /etc/systemd/system/motion-camera.service
[Unit]
Description=Motion Detection Camera
After=multi-user.target
Conflicts=aim-camera.service timelapse-camera.service
[Service]
Type=exec
User=tim
WorkingDirectory=/home/tim/camera
ExecStart=/usr/bin/python3 /home/tim/camera/record-motion.py
Restart=on-failure
RestartSec=5
KillSignal=SIGINT
TimeoutStopSec=20
StandardOutput=journal
StandardError=journal
[Install]
WantedBy=multi-user.target
```
```
sudo nano /etc/systemd/system/aim-camera.service
[Unit]
Description=Camera UDP Aiming Stream
Wants=network-online.target
After=network-online.target
Conflicts=motion-camera.service timelapse-camera.service
[Service]
Type=exec
User=tim
WorkingDirectory=/home/tim/camera
ExecStart=/home/tim/camera/aim-camera.sh
Restart=on-failure
RestartSec=5
KillSignal=SIGINT
TimeoutStopSec=10
StandardOutput=journal
StandardError=journal
[Install]
WantedBy=multi-user.target
```
```
sudo nano /etc/systemd/system/timelapse-camera.service
[Unit]
Description=Camera Timelapse
After=multi-user.target
Conflicts=motion-camera.service aim-camera.service
[Service]
Type=exec
User=tim
WorkingDirectory=/home/tim/camera
ExecStart=/home/tim/camera/timelapse-camera.sh
Restart=on-failure
RestartSec=5
KillSignal=SIGINT
TimeoutStopSec=20
StandardOutput=journal
StandardError=journal
[Install]
WantedBy=multi-user.target
```
Activate teh services
```
sudo systemctl daemon-reload
```
Set one as starting service
```
sudo systemctl disable --now aim-camera.service
sudo systemctl disable --now timelapse-camera.service
sudo systemctl enable --now motion-camera.service
```
check
```
systemctl status motion-camera.service
```
# Create putty status display (service control)
```
sudo chmod +x /usr/local/bin/camera-status
```
```
#!/bin/bash
show_service()
{
local label="$1"
local unit="$2"
local active
local enabled
local state
active="$(systemctl is-active "$unit" 2>/dev/null || true)"
enabled="$(systemctl is-enabled "$unit" 2>/dev/null || true)"
if [ "$active" = "active" ]; then
state="ACTIVATED"
else
state="DEACTIVATED"
fi
printf "%-20s %-12s boot: %s\n" "$label:" "$state" "$enabled"
}
echo
echo "================ CAMERA STATUS ================"
show_service "Motion detection" "motion-camera.service"
show_service "Aim stream" "aim-camera.service"
show_service "Timelapse" "timelapse-camera.service"
echo
echo "Commands:"
echo " motion-on motion-off"
echo " aim-on aim-off"
echo " timelapse-on timelapse-off"
echo " camera-status"
echo "================================================"
echo
```
```
sudo chmod +x /usr/local/bin/camera-status
```
create the commands
```
nano ~/.bashrc
```
Append at the bottom
```
# Camera service commands
alias motion-on='sudo systemctl start motion-camera.service'
alias motion-off='sudo systemctl stop motion-camera.service'
alias aim-on='sudo systemctl start aim-camera.service'
alias aim-off='sudo systemctl stop aim-camera.service'
alias timelapse-on='sudo systemctl start timelapse-camera.service'
alias timelapse-off='sudo systemctl stop timelapse-camera.service'
alias camera-status='/usr/local/bin/camera-status'
# Show camera status when opening PuTTY/SSH.
if [[ $- == *i* ]]; then
/usr/local/bin/camera-status
fi
```
Now apply:
```
source ~/.bashrc
```
# Add Fileshare
```
sudo nano /etc/samba/smb.conf
```
Append at bottom:
```
[videos]
path = /home/tim/videos
browseable = yes
read only = no
valid users = xxx
create mask = 0664
directory mask = 0775
[timelapse]
path = /home/xxx/timelapse
browseable = yes
read only = no
valid users = tim
create mask = 0664
directory mask = 0775
```
Set your password
```
sudo smbpasswd -a xxx
sudo systemctl restart smbd
```